As we move into the warmer months of the year it is vital you have your bike cleaned and serviced before taking it out. We have put together a few handy tips to help you when it comes to bicycle maintenance and cleaning.
- Time: 1 hour
- Skill rating: Easy
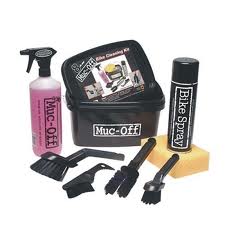
- Cost: Degreaser, grease, chainlube (approx. £15)
- Buy bike cleaning kit from your local bike shop or online retailer
Tools you’ll need
- Bucket
- Very hot water
- Washing-up liquid
- Brushes and sponges
- Old toothbrush
- Narrow flat-blade or screwdriver
- Old spoke
- Degreaser
- Polish/detailer
- Grease
- Chain lube
- Rags
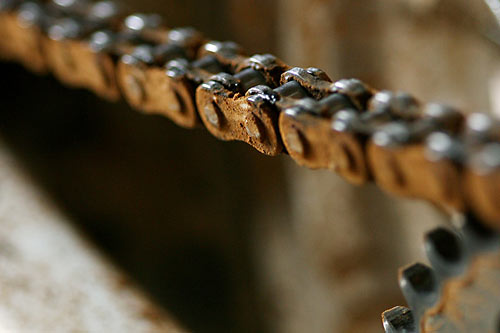
1] Scrub the chain: The chain is the most important part of the transmission. The first step to cleaning it is to use hot water — wearing rubber gloves will help you use hotter, more effective, water. Add regular washing-up liquid to your bucket of water and allow it to foam up.
With the chain in the biggest gear, apply the mixture vigorously using a stiff bristle scrubbing brush. You’ll see a bright, shining chain emerge.
2] Degrease the chain: With the chain free from dirt, apply a biodegradable degreaser to the chain and allow it to soak into all the links. This will remove any debris and sticky residues you can’t see, and make for a free-running chain.
Rotate the cranks backwards a few times to get the degreaser right into the links. Allow to drip-dry, or wash off with clean water.
3 Wipe the chain: Use a soft rag to wipe the chain completely clean — you’ll be surprised what still comes off a clean-looking chain. You’re trying to massage the links, moving them through as wide a range of movement as possible — this helps expose the sections of link normally hidden from view.
4] Lube the chain: Apply lube only when the chain is clean. We prefer to lube a chain as little as possible, with as light a lube as we can get away with. Use a dripper bottle, because it’s easier to apply accurately and with minimum wastage.
Coat the whole chain, spinning the cranks to force the lube into the links. That’s where lube is most useful — not coating the outside plates, as many believe. Wipe excess lube away with a rag.
5] Wipe cables: Slide the outers to expose previously covered sections of inner cable. Give the entire inner cable a wipe-over with a section of rag soaked in degreaser. If you come across any sections that are rusty, replace with a new inner cable. Most dry cables can be reinvigorated with a little light grease.
6] Lube cables: The best way to apply grease evenly to a cable is to first apply the grease to a clean (lint-free) rag. Holding the rag in one hand with the greased section between thumb and forefinger, gently pinch the section of inner cable in the rag and draw it through.
The idea is to allow the grease to get into the fine strands of the cable without creating any blobs of grease.
7] Scrub front mech: Front mechs always suffers from neglect. They’re hard to access and are often jammed full of dry mud, and have pivots drier than a Jacob’s Cracker. The first thing you can do to get your front mech swinging happily again is to apply steaming soapy water. Use a small toothbrush to get right into the parallelogram and underneath the band.
8] Wipe front mech: Give the mech a good going over with the rag. Use a thin strip of rag to thread though the body of the front mech — this allows you to floss the body. Don’t overlook the inside of the front mech cage, as these get pretty grubby from rubbing the chain all day. A couple of minutes and you should have a gleaming front mech.
9] Scrape out rear mech: There’s no point having a free-running chain if the jockey wheels of your rear mech are bunged up. Use an old spoke or the blade of a thin, flat-bladed screwdriver to carefully hook out any old grass and oily gunge that’s trapped between the jockey wheels and the mech arm side plates.
10] Scrub Jockey Wheels: With the serious grime gone, use a little degreaser and an old toothbrush to scrub the jockey wheels (not forgetting the insides of the mech arm). It’s possible to unscrew the jockey wheels from the mech arm, but we don’t recommend you do so unless you’ve got a thread lock to use when reinstalling the pivot bolts. Sadly, we’ve seen too many rides ended by bottom jockey wheels falling out.
11] Lube Jockey Wheels: Re-lube the jockey wheels. They really only need the very lightest touch of lube, as they’ll pick up enough from the chain through use. Remember these little wheels attract a lot of dirt, and with lube being sticky, it doesn’t pay to make matters worse by overdoing it. Wipe the excess away with a rag. They should look dry.
12] Unclip cables: Set the rear gears into the largest rear sprocket and then, without letting the rear wheel spin, shift into the smallest rear sprocket. This will free up a bunch of inner cable and allow you to pop the outers from the slotted cable stops on the frame. With the cables now fully unclipped from the frame you can inspect, clean, re-lube and reinstall everything.
13] Lube Front Mech: Use the lube dropper bottle to apply drops of lube to all the pivots on the front mech. These take a lot of load, and can use all the help you can give them to remain mobile. Shift the mech into the smallest chainring and then work the parallelogram with your fingers to get the lube worked in.
14] De-Gunk Rear Sprockets: The rear sprockets are the final port of call on this bicycle maintenance mystery tour. They’re full of technology to help faster shifts, but also full of grease, mud and grass. Pick the worst lumps out with an old spoke or the blade of a thin, flat screwdriver. You’ll be surprised what hides in those tight spaces, even on expensive, open alloy carrier versions.
15] Scrub Rear Sprockets: Get the hot soapy water on them and get scrubbing with a brush. Really stubborn grot can be shifted with a dose of degreaser and another hit with the scrubbing brush. Getting to the backs of the sprockets can be tricky, but it’s really worth persevering, as the cleaner you make it, the less easy it is for new mud to stick.
16] Wipe Rear Sprockets: Give the sprockets some flossing with your strip of rag. This helps dry the sprockets, and also buffs away any outstanding marks. The cleaner you can keep your sprockets, the faster they’ll shift and the longer they’ll last. Dirt acts like a grinding paste when in contact with any part of your transmission, so get rid of it.
I. Tip: don’t forget the general clean-up: You can get away with just cleaning the important parts, but a full wash-down should be part of your regular post-ride plans. Take the wheels off the bike and wash everything, beginning with the underside of the saddle and working downwards.
II. Tip: lube the pivots: Add a drop of lube to your brake lever pivots — they dry out too and work better with some liquid love. Ditto the shifters. For SRAM X.9/X.0 gears, simply unscrew the top caps and drop a few drops on the spring and cable nipple. With Shimano, undo the plastic grub screw and put a few drops inside before replacing the grub screw.
III. Tip: polish it off: If you love your bike, show it off by taking a soft duster and some nice polish and giving the paintwork a buffing it’ll never forget. Apart from making the bike look shiny, it also helps make it harder for dirt to stick to the frame the next time you’re out.
IV. Tip: hot water and detergent FTW: The marketplace is rammed with bike cleaning fluids, and they’re mostly pretty good. Most are applied using a trigger bottle spray, requiring you to leave it on for 30 seconds and then wash off with a brush.
That’s all well and good, but we have just as much success with car shampoo and hot water. You can even use washing up liquid, but remember it contains salt so you want to be sure you get it all off. For all the marketing hype, the detergent and the grime-busting strength of steaming hot water are hard to beat. Have a good selection of sponges and brushes available to get into all the nooks and crannies.
Post courtesy of: onyourbike & BikeRadar